Auth0 + Angularでの認証機能実装
Auth0を利用して、Angularで作成したアプリに認証機能を実装してみました。
Auth0のドキュメントにAngular向けのQuickStartがあるので、そのまま実装すればAuth0を利用できます。
Auth0 Angular 2+ SDK Quickstarts: Login
今回はAuth0で用意されているログイン画面の利用と認証後に扱うことが可能なユーザ情報の表示をやってみました。
ログイン
Auth0 Angular 2+ SDK Quickstarts: Login
つまずくポイントとしては、Auth0のログイン画面から戻ってきた場合にルートコンポーネントのコンストラクタが呼ばれることです。
ngOnInitメソッドは呼ばれないようです。
下記のようにルートコンポーネントで認証後の処理を行なっています。
import { Component } from '@angular/core';
import { AuthService } from './auth/auth.service';

@Component({
  selector: 'app-root',
  templateUrl: './app.component.html',
  styleUrls: ['./app.component.css']
})
export class AppComponent {

  constructor(public auth: AuthService) {
    auth.handleAuthentication();
  }

}
ユーザ情報の利用
Auth0 Angular 2+ SDK Quickstarts: User Profile
QuickStartのコードの場合、認証後に別コンポーネント上でユーザの情報を表示するという作りになっています。
実用的なパターンとしては、認証済みであれば、ヘッダー部にユーザ情報を表示するというケースがあるかなと思いますので、それを実現するように作り変えてみました。
GitHub - hi1280/auth0-angular-samples
app.component.tsで認証及びユーザ情報の表示を行なっています。
app.component.ts
import { Component, OnInit } from '@angular/core';
import { AuthService } from './auth/auth.service';

@Component({
  selector: 'app-root',
  templateUrl: './app.component.html',
  styleUrls: ['./app.component.css']
})
export class AppComponent implements OnInit{
  profile: any;

  constructor(public auth: AuthService) {
    auth.handleAuthentication(() => {
      this.initProfile();
    });
  }

  ngOnInit() {
    this.initProfile();
  }

  logout() {
    this.profile = undefined;
    this.auth.logout();
  }

  initProfile() {
    if (this.auth.userProfile) {
      this.profile = this.auth.userProfile;
    } else {
      if (this.auth.isAuthenticated()) {
        this.auth.getProfile((err: any, profile: any) => {
          this.profile = profile;
        });
      }
    }
  }

}
auth.service.ts
import { Injectable } from '@angular/core';
import { AUTH_CONFIG } from './auth0-variables';
import { Router } from '@angular/router';
import 'rxjs/add/operator/filter';
import * as auth0 from 'auth0-js';

@Injectable()
export class AuthService {

  auth0 = new auth0.WebAuth({
    clientID: AUTH_CONFIG.clientID,
    domain: AUTH_CONFIG.domain,
    responseType: 'token id_token',
    audience: `https://${AUTH_CONFIG.domain}/userinfo`,
    redirectUri: AUTH_CONFIG.callbackURL,
    scope: 'openid profile'
  });

  userProfile: any;

  constructor(public router: Router) {}

  public login(): void {
    this.auth0.authorize();
  }

  public handleAuthentication(cb: any): void {
    this.auth0.parseHash((err, authResult) => {
      if (authResult && authResult.accessToken && authResult.idToken) {
        window.location.hash = '';
        this.setSession(authResult);
        cb();
        this.router.navigate(['/home']);
      } else if (err) {
        this.router.navigate(['/home']);
        console.log(err);
        alert(`Error: ${err.error}. Check the console for further details.`);
      }
    });
  }

  public getProfile(cb): void {
    const accessToken = localStorage.getItem('access_token');
    if (!accessToken) {
      throw new Error('Access token must exist to fetch profile');
    }

    const self = this;
    this.auth0.client.userInfo(accessToken, (err, profile) => {
      if (profile) {
        self.userProfile = profile;
      }
      cb(err, profile);
    });
  }

  private setSession(authResult): void {
    // Set the time that the access token will expire at
    const expiresAt = JSON.stringify((authResult.expiresIn * 1000) + new Date().getTime());
    localStorage.setItem('access_token', authResult.accessToken);
    localStorage.setItem('id_token', authResult.idToken);
    localStorage.setItem('expires_at', expiresAt);
  }

  public logout(): void {
    this.userProfile = undefined;
    // Remove tokens and expiry time from localStorage
    localStorage.removeItem('access_token');
    localStorage.removeItem('id_token');
    localStorage.removeItem('expires_at');
    // Go back to the home route
    this.router.navigate(['/']);
  }

  public isAuthenticated(): boolean {
    // Check whether the current time is past the
    // access token's expiry time
    const expiresAt = JSON.parse(localStorage.getItem('expires_at'));
    return new Date().getTime() < expiresAt;
  }

}
handleAuthenticationメソッドにコールバック関数を渡して、認証後にユーザ情報の取得を行なっているのが修正のポイントです。
まとめ
Auth0を利用すれば、Google、FacebookやTwitterといったソーシャルな認証プロバイダーを利用して、ユーザ情報を取得できるため、面倒な認証処理の実装がショートカットできます。
APIの保護などもできるようなので、認証にまつわる面倒ごとを色々省くことができるようです。

- 作者: 山田祥寛
- 出版社/メーカー: 技術評論社
- 発売日: 2017/08/04
- メディア: 大型本
- この商品を含むブログを見る
MEAN and Cosmos DBをVisual Studio Team ServicesでAzure App Serviceにデプロイする
サンプルアプリの準備
MEAN構成のサンプルアプリとして以下を使用する
https://github.com/hi1280/angular-cosmosdb
前提条件
Azure CLI 2.0をインストールしている
https://docs.microsoft.com/ja-jp/cli/azure/install-azure-cli
Angular CLIをインストールしている
npm install -g @angular/cli
VSTSのプロジェクトが作られている
https://www.visualstudio.com/en-us/docs/setup-admin/team-services/sign-up-for-visual-studio-team-services
Cosmos DBの作成
以下のコマンドを実行する
# コマンドのオプションは環境に応じて適宜変更する
az login
az group create -n my-heroes-db-group -l "Japan East"

# Cosmos DBをMongoDBのAPIで作成する
# Cosmos DBの名前が競合して作成できない場合、-nオプションの値を適宜変更する
az cosmosdb create -n my-cosmos-heroes-example -g my-heroes-db-group --kind MongoDB
サンプルアプリとCosmos DBの連携
Cosmos DBの接続文字列を確認する
az cosmosdb list-connection-strings -n my-cosmos-heroes-example -g my-heroes-db-group --query "connectionStrings[0].connectionString"
example-environment.jsを接続文字列の内容に沿って修正する
このパラメータはサンプルアプリからCosmos DB(MongoDB)に接続する際の接続文字列に使われる

example-environment.jsのファイル名をenvironment.jsに変更する
ローカルでアプリを起動する
# Angular CLIのビルド実行
npm run build

# Node.jsの実行
npm start
http://localhost:3000をブラウザで開く
Azure App Serviceの作成
az group create --location "Japan East" --name myResourceGroup

# FREEプランで作成
az appservice plan create --name my-app-heroes-plan --resource-group myResourceGroup --sku FREE
az webapp create --name my-app-heroes-example --resource-group myResourceGroup --plan my-app-heroes-plan

# node.jsのバージョン指定
az webapp config appsettings set -g myResourceGroup -n my-app-heroes-example --settings WEBSITE_NODE_DEFAULT_VERSION=6.11.1
Visual Studio Team Services(VSTS)との連携とデプロイ
プロジェクトをVSTSにPushする
プロジェクトルートで以下のコマンドを実行する
# 既存のgitリポジトリを削除
rm -fR .git

# gitのローカルリポジトリに対する操作
git init
git add .
git commit -m "initial commit"

# gitのリモートリポジトリに対する操作
# xxxxxは任意
git remote add origin https://xxxxx.visualstudio.com/_git/my-app-heroes-example
git push -u origin --all
VSTS上でプロジェクトのビルド定義をする
ビルドタスクは以下の通りに定義する
Get Sources
This Projectを選択する- 該当のリポジトリとブランチを選択する
npmパッケージをインストール
Add Taskをクリックし、npmを追加するinstallコマンドを選択する
Angular CLIのビルド実行
Add Taskをクリックし、npmを追加するcustomコマンドを選択するCommand and argumentsをrun buildと入力する
サーバのnpmパッケージをインストール
Add Taskをクリックし、npmを追加するinstallコマンドを選択するWorking folder with package.jsonをdistと入力する
成果物を公開する
Add Taskをクリックし、Publish Build Artifactsを追加するPath to Publishをdistと入力するArtifact Nameをdistと入力するArtifact TypeでServerを選択する

VSTS上でプロジェクトのリリース定義をする
リリースタスクは以下の通りに定義する
Artifact
- ビルドのArtifactの最新を選択する
Azure App Serviceにデプロイする
Run on agentの+マークをクリックし、Azure App Service Deployを追加する- Azure subscription及びApp Service nameを適宜選択する
Package or folderを$(System.DefaultWorkingDirectory)/my-app-heroes-example-build/distと入力するGenerate Web.configにチェックをつけるWeb.config parametersを-Handler iisnode -NodeStartFile index.js -appType nodeと入力するPublish using Web Deployにチェックをつける

VSTS上からビルド及びリリースを実行した後に、Azure App ServiceのURLを開くとアプリが実行できる
Visual Studio CodeでTypeScriptを書くときのオススメ設定
2018/12/10 コードフォーマットに関してPrettierの情報を追記
TypeScriptにある便利機能をVisual Studio Code(以下、VSCode)がいい感じに可視化してくれるので、この二つの組み合わせは非常に良いです。
その中でも個人的に良いと思った機能と設定方法を紹介します。
なお、動作確認は以下のバージョンで行なっています。
Node.js: 6.11.1
TypeScript: 2.4.2
VSCode: 1.14.2
tslint: 5.5.0
誤りを教えてくれる
Compiler Optionsの--strictを有効にする
https://www.typescriptlang.org/docs/handbook/compiler-options.html
--strictを有効にすることで、Compiler Optionsの以下を全て有効にしたことと同様になります。
- --noImplicitAny
- --noImplicitThis
- --alwaysStrict
- --strictNullChecks
この中でも、--strictNullChecksはコード中のnullやundefinedを極力なくすことができるので良いです。
let strA: string = "str";
// error TS2322: Type 'null' is not assignable to type 'string'.
strA = null;

let strB: string | null = "str";

strB = null;

let objA: {x: string,y?: number} = {x: "str"};

// error TS2532: Object is possibly 'undefined'.
objA.y.toString();

if(objA.y) {
  objA.y.toString();
}
nullを代入するには、nullを許容する型にする必要あり。
オブジェクトでオプショナルなパラメータを定義した場合など、undefinedが許容される可能性がある場合に
そのままパラメータにアクセスしようとすると、エラーになる。
if文で存在チェックをすると、エラーが解消される。
便利だし、安全です。
VSCode上でもいい感じに可視化してくれます。

設定方法
下記コマンドでtsconfig.jsonを新規作成すると楽です。
tsc --init
strictが有効な設定でtsconfig.jsonが作られます。
tslintとvscode-tslintを使う
tslintはTypeScript用の静的解析ツールです。
vscode-tslintはtslintのVSCode用拡張機能です。tslintの結果をVSCode上にいい感じに出力してくれます。

設定方法
tslintのインストール方法
npm install -g tslint
vscode-tslintのインストール先
https://marketplace.visualstudio.com/items?itemName=eg2.tslint
tslintの設定
下記コマンドでtslint.jsonを新規作成すると楽です。
tslint --init
デフォルトのLintの設定が下記になるので、必要に応じて、ルールを個別に設定すれば良いと思います。
https://github.com/palantir/tslint/blob/master/src/configs/recommended.ts
tslintのルール一覧
https://palantir.github.io/tslint/rules/
正しく直してくれる
VSCodeのフォーマット機能を使う
VSCodeではTypeScriptを標準でサポートしていて、コードのフォーマット機能があります。

設定方法
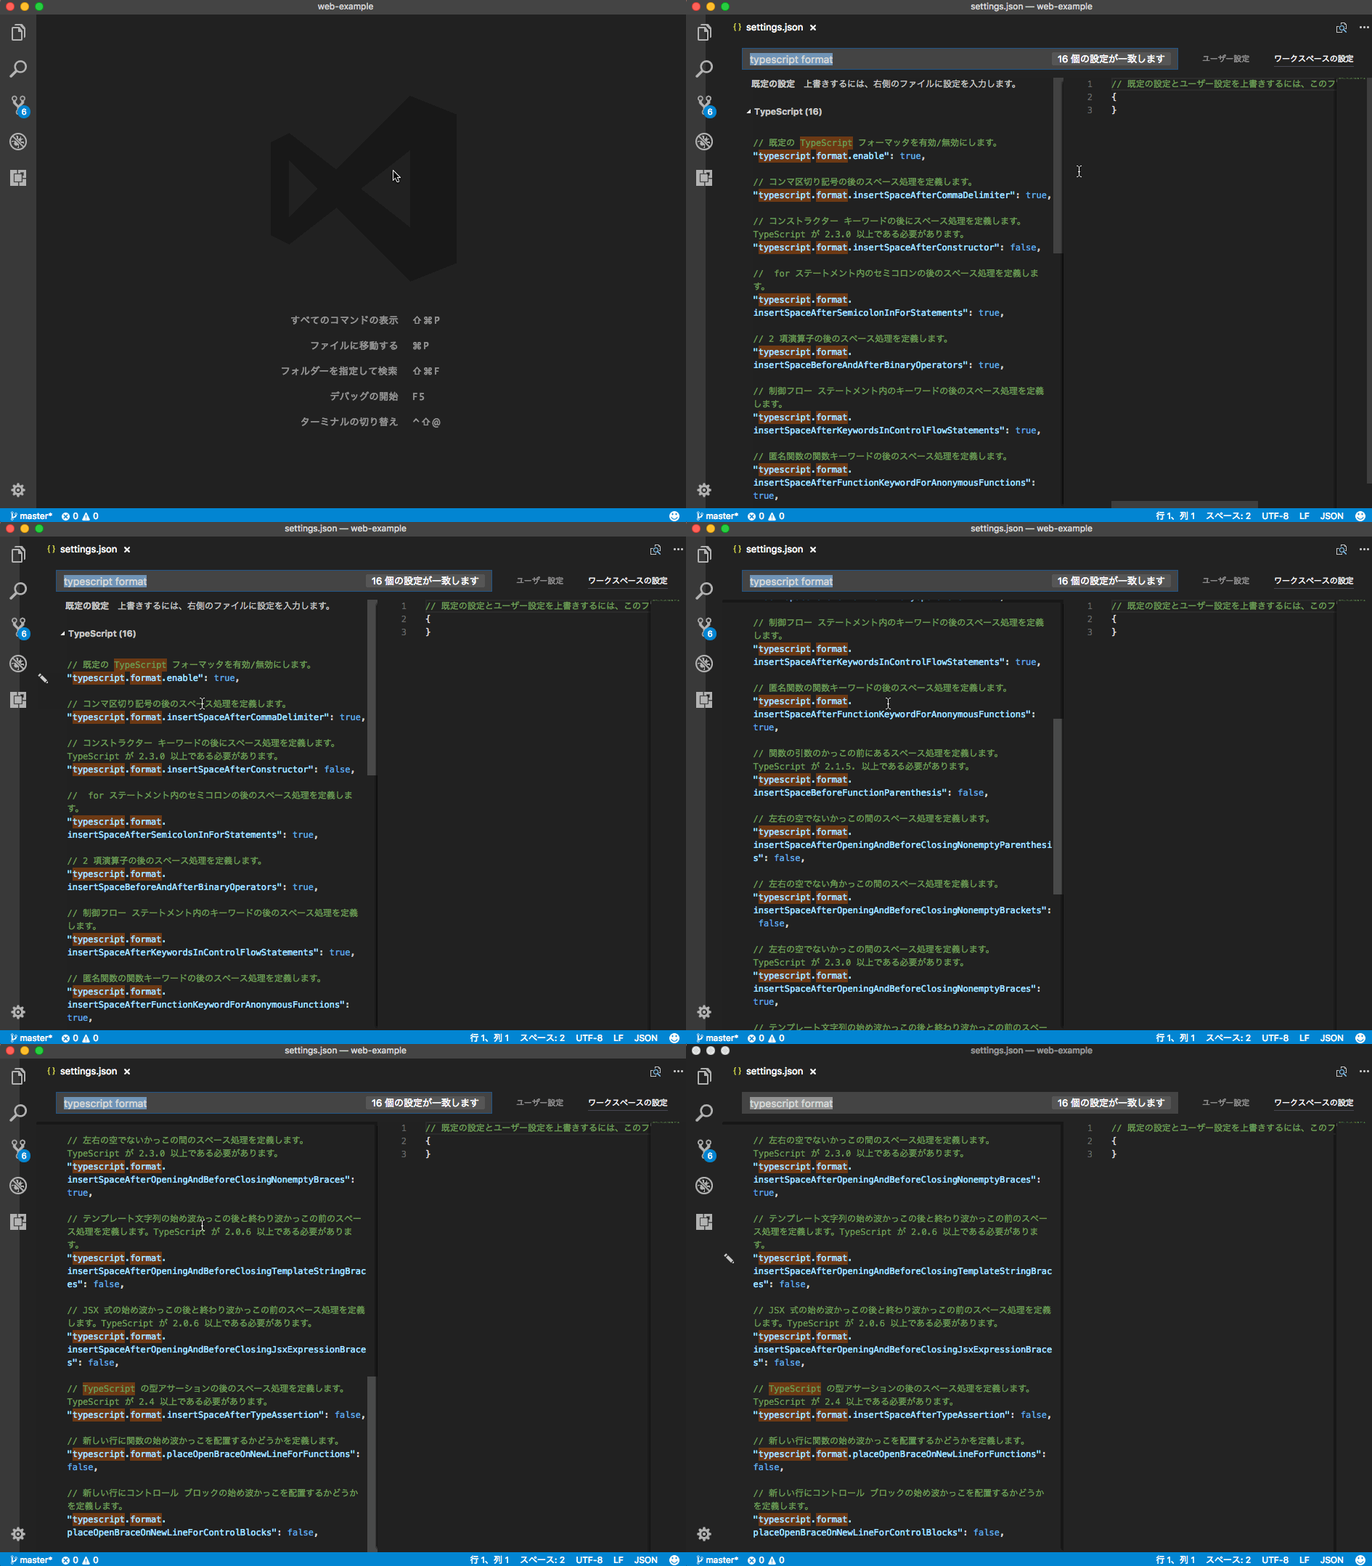
フォーマットの設定はVSCodeの設定から変更することができます。

2018/12/10 追記
VSCodeのフォーマット設定は少し煩雑でどう設定していいのかわかりづらいです。
最近はPrettierを使うのがデファクトスタンダードのようです。
誤りの追跡がしやすい
Debugger for Chromeを使う
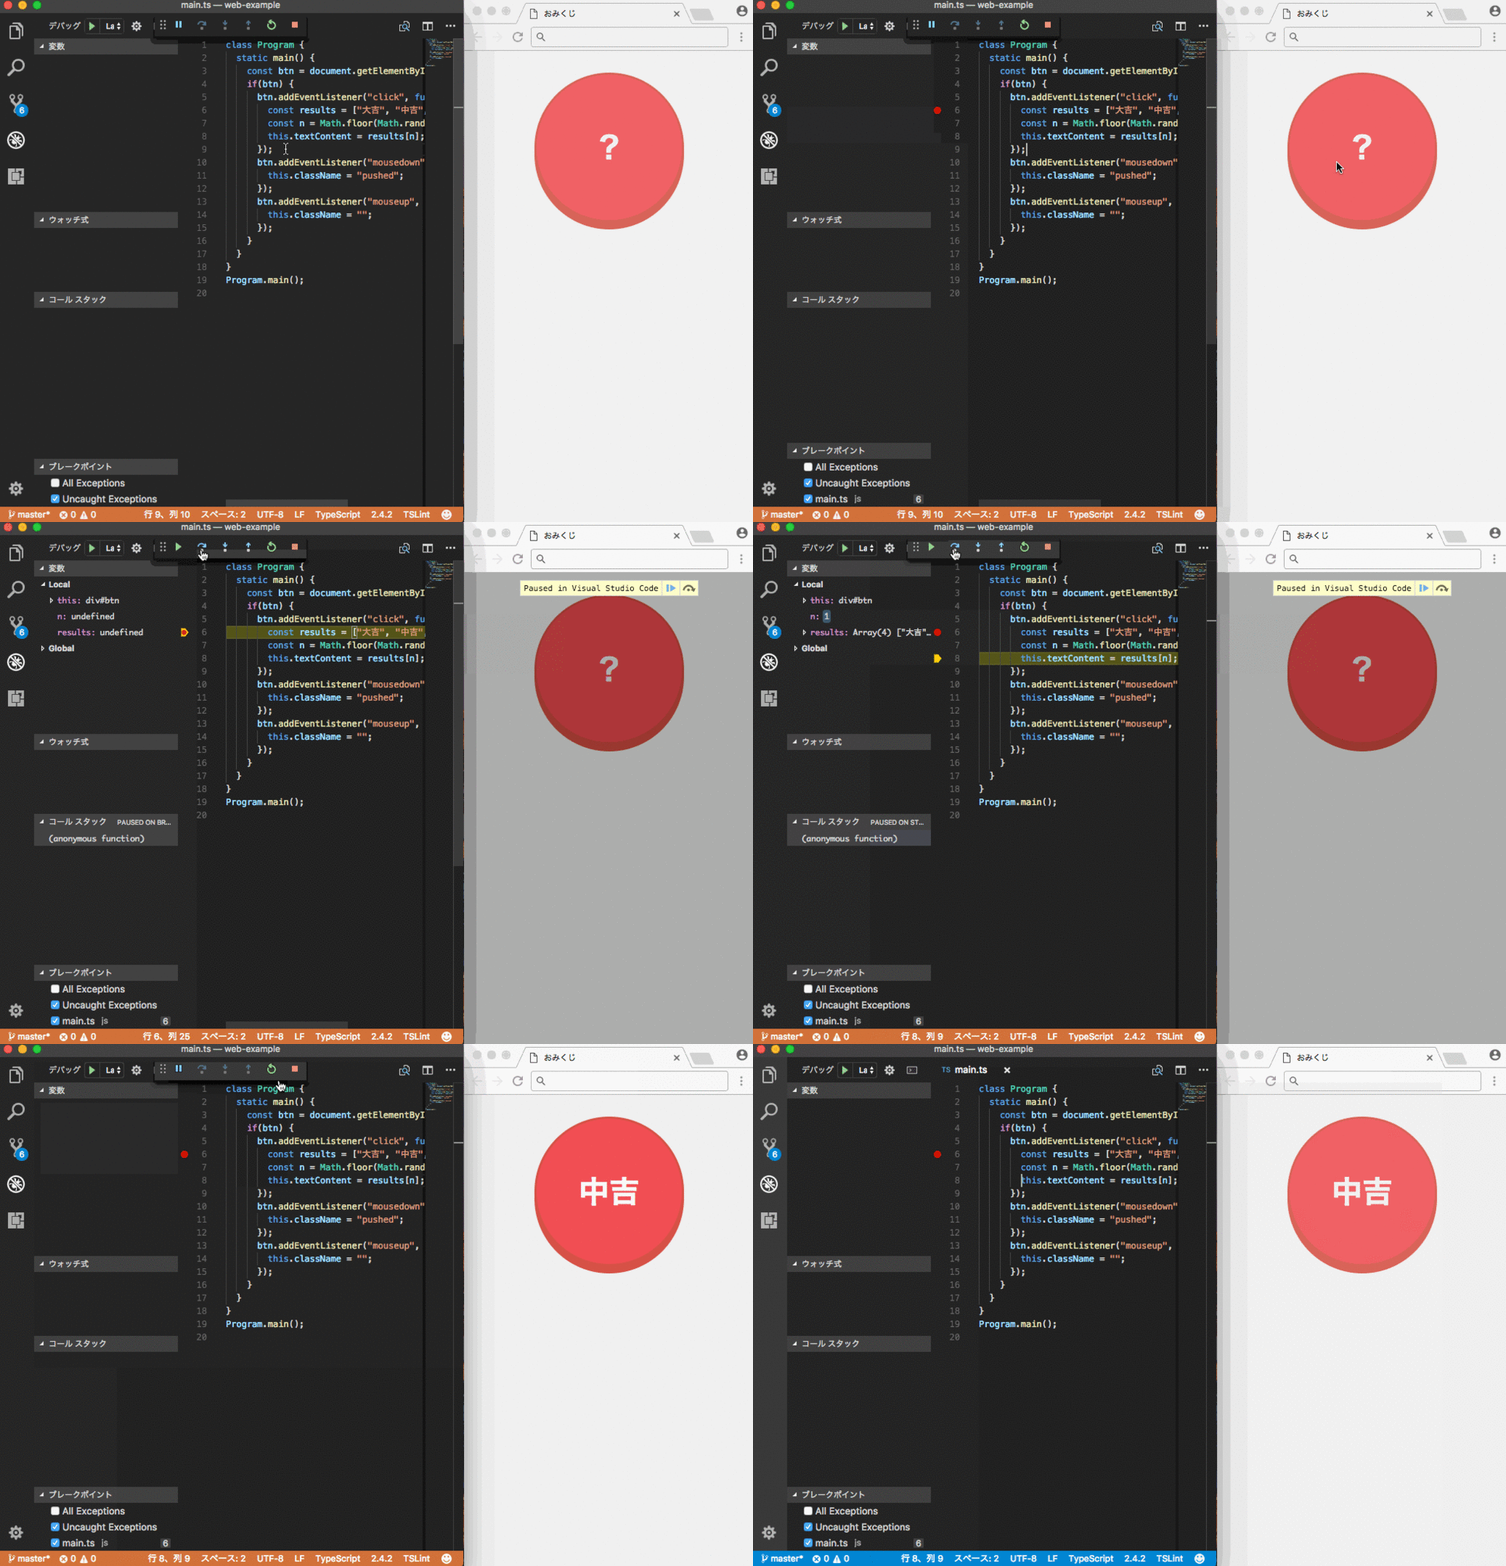
Debugger for ChromeはVSCodeの拡張機能です。Chrome上での実行に対して、VSCodeのデバッグ機能が使えるようになります。

設定方法
Debugger for Chromeのインストール先
https://marketplace.visualstudio.com/items?itemName=msjsdiag.debugger-for-chrome
launch.jsonの設定
{
  "version": "0.2.0",
  "configurations": [
    {
      "type": "chrome",
      "request": "launch",
      "name": "Launch Chrome",
      "url": "http://localhost:8080",
      "webRoot": "${workspaceRoot}"
    },
    {
      "type": "chrome",
      "request": "launch",
      "name": "Launch Chrome to local file",
      "file": "${workspaceRoot}/index.html"
    }
  ]
}
localにあるファイルを開く場合とurlにアクセスする場合の設定があります。
最後はTypeScript関係ないですが(汗
とりあえずVSCodeは機能が充実していて良いって話です。
2018/12/04 追記
VSCode+TypeScriptのCLI開発向け雛形構成を作りました hi1280.hatenablog.com
